December 30, 2007

tiny jewellery shrines


I have had these teeny little shrines for awhile and finally put them together, I had to have a play with my camera to find the right settings to show as much detail as possible...well here they are!

The two arched shrines are 1.5 inches tall and the window shrine is 2 inches tall.
They were so simple to put together and a lot of fun, I purchased them from Artistic Journey in Western Australia, www.coffeebreakdesign.com is the manufacturer of them.

December 24, 2007

Christmas tree O christmas treeeeee


I picked up this sweet little Kaiser craft wooden xmas tree a few months again...and ever one to leave things to the last minute...I started it late last night and finished it this morning :)

It has all my fave things on it...fusible film, gel medium, stamping, resist, rub n' buff...I only did numbers "2" and "5" lol

December 22, 2007

Nude Arch...yay I caught up with Nisha :)


this BG is lovely velvet paper that I have gold embossed for a bit of added glitz and glamour.
Ahhh now I can relax...NOT!!!

I amaze myself sometimes


The three arches are part of the challenge Nisha and I have between us, today I made "Christmas"...so many layers because I just wasn't happy, in the end I stamped onto fusible film and embeded it into gel medium, it has gold and silver shim snowflakes and a grungeboard star (gawd I love that stuff).
My "Nature" arch is layered stamping and a piece of KI Memories lacy "flower Child" (white)paper, that I used some starburst stains on, I then smeared the whole arch with gel medium and embeded the lacy paper into it, added some rub n' buff, gems and a diamond glazed butterfly and german scrap.
The "Wings" themed arch is simply spin painting, stamping and shellacing.
The two little hangy key chain things were prezzies I made for a couple of friends...I have about 30 more to do :)
So Nisha if you are wondering were my fourth arch is..."Nudes"...well she is just about done, then I'll be caught up to you :)

another Grungeboard canvas


I really love this image, so I used her again on another canvas, this BG is liquid nails and fusible film. I've drapped some bleached gauze over her shoulder.

December 17, 2007

my play with Grungeboard


well I got my little stash of Grungeboard today (thanks to Nat at Scraptivate for sending it so quickly). It smells like a new basket ball, it has a sort of rubbery smell that goes with it's rubbery feel, it comes out cleanly and is very resiliant. I stamped on it, heated it, scrunched it up, stained it...all in all I had fun with it. It is terrific value also.
Well enough of my rambling, here are a couple of things I made:
I made a simple sign for the boy's bedroom door, the hangy heart thingy might end up on the front of a book yet, and the canvas (5x7)is my fave, I have added two photos of her so you can see the difference when she is laid down and upright....her wings, crown and the flourish are all grungeboard, the wings have fusible film on them and I was very impressed with how well it took it, instead of gold embossing I simply highlight the pattern with gold rub n' buff, swiped them with gel medium and super heated the film as per usual. (I painted them green first with a green starburst stain), I love that the heat caused the film to curl the wings a little.
Now go buy Grungeboard and have fun!!!

December 06, 2007

EK Success Consumer Board


I had a cool surprise the other day, I received a little parcel from EK Success, I hadn't ordered anything so it was a bit of a mystery, on opening the envelope I read that I had been chosen to be on their consumer board, this means that from time to time they will send me goodies to sample.
Anybody who knows me knows that I love trialing different glues and adhesives, so I was thrilled to get a full sized permanent "Sticko", it looks soooo cool, it is pink and very slim, fits comfortably in your hand, is refillable and takes up very little room in your trusty art tote, and the adhesive itself is top quality, so while I don't have to promote products I am more than happy to recommend it.

Gothic Shoe


I'm not really sure if this is finished just yet, it's still a bit plain looking to me.

a couple of arches


now that my art room is organised and I know where everything is I am finally able to get settled into teaching again, Nisha and I are working on a Gothic Arch book each, we both came up with 10 themes to follow.
TIME
WINGS
VINTAGE
NUDE
WATER
NATURE
ROYALTY
BLING
EMOTION
ANIMAL
CHRISTMAS
POCKETS
WINTER
BUTTONS
CIRCLES
FLOWERS
MOON
CHILDREN
BIRTHDAY
CHOCOLATE

They should be very interesting books when they are done.
The pictures you see here are my "Time" and "Vintage" pieces.

teeny weenie housie


I thought I had better show the front of the housie that I just showed you all below in the textured tutorial, I did resist stamping with my fave. Micky Choo diamond stamp and I stamped "Mrs Smiley" on a little transparency...she and the brick stamp are both from PaperArtsty.

SPECIAL TUTORIAL FOR THE GALS AT ZUZU'S


Well my friends as I promised here is my tutorial for you, it shows how I made the textered backs for the little chipboard housie charms.
I used Atelier Interactive acrylic paints (rich gold, dioxazine purple and quinacridone magenta).
Quinacridone/nickel Azo Gold (Golden Acrylics)was watered down and used as a wash but any rusty red brown will work.

I used my heat gun between every step to get maximum texture.

November 17, 2007

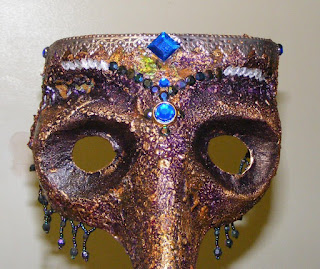
the mask


finally I decided to finish the mask I began earlier this year..well maybe it's finished, I might keep adding to it but so far I really like the way it looks :)
I ran out of liquid nails, so I opted for a tube of texture paste (Kaiser), it worked just as well and even reacted nicely to the heat gun by bubbling and blistering.

November 11, 2007

Xmas Wreath


wowo I wish there were more hours in a day...

I have some new upcoming classes at Fred the Needle, I will be teaching altered shoes on the 30th of November (AM & PM), and on the 8th of December I am teaching how to alter a Xmas wreath, if you are interested give Simone a call at FTN (Penrith) and she will sign you up :)

October 28, 2007

These shoes are made for walking


well perhaps not...I have a challenge on my yahoo group where we are altering children's shoes, here is my first effort. the original shoe is a little girl's shiny black dress shoe, I have then covered it in liquid nails for texture, before it had a chance to harden I made swirls with my palette knife. Once dry I then painted with pthalo green, did a dabbled wash over with a sea sponge and copper and gold, the next step was using my heat gun...not to dry the paint but to bubble it and make it even more textured. I smeared a little antique gold Rub 'n Buff over the raised areas and then attached adornments, etc.
See one of my previous posts to see how I altered the German Scrap pieces.

The red shoe is not finished yet but I just love the colour so far.

October 01, 2007

wonderful Dresden trim AKA German Scrap


There are a few things I love and one of those things is German Scrap, I really like that I can change it's appearance so very easily too...very very easily!
I have tried a few things on the gold coloured pieces earlier in the year (these ones shown are available from Scraptivate in Western Australia), I tried vinegar....don't ask why because I do these things when I'm having a "moment" lol....anyway the vinegar stripped the colour right out and left it smelling like fish and chips, so I moved onto "Silvo" silverware polish, it stripped the colour out too and left the piece quite fragile.
Soooo I went back to my trusty fave. and as always it leaves the pieces fabtacular and devine.
Rub n' Buff is the way to go, it strips out the gold and leaves a nice trace colour behind, every colour is different, so it really pays to play...Spanish Copper is the one I use the most, followed closely by black and turquoise. We stock some colours at FTN, you can also purchase from places like Bunnings and Spotlight.

Now go play!...and get your hands dirty!